Image Map

Saturday, January 25, 2014

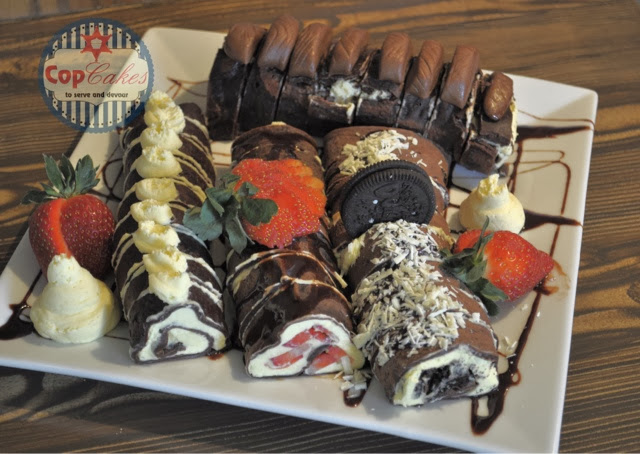
Chocolate Sushi

Sounds weird, right?

Well, it's delicious! Oh, and easy to make. Waaaaay easier than real sushi, I assume. I've never actually made real sushi. It looks too hard. 


This will also freak out your friends (if that's not fun, nothing is) and turn any sushi-hater into a new fan. Really, you only have to be a lover of chocolate and all things dessert to enjoy this.

Here's how I made mine. Using what you have in your fridge plus imagination is really the best way to go!

First I made chocolate crepes (recipe here). 
I made a few extras just in case I had any mess ups. I'm not the best pancake flipper so I knew I'd need extra! I also made mine a little thicker, between a crepe and a pancake, I didn't add quite as much milk. I also spread out the batter as large as I could in the pan while keeping it thick. 

Then I set those aside to cool and made easy vanilla mousse (recipe here). 

Seriously, "mousse" sounds so snobby and French and difficult. It's not! Plus it's yummy.

Next I chopped up my fillings, or what would be the raw fish if this was real sushi. In my case I used strawberries and crushed Oreos. (Here is where you get creative! All kinds of fruit, candy or sweet sauces would be great!)

Now for the assembly process! 

Lay one crepe down flat on a large cutting board. Spread a layer of mousse about 1/4" thick across the entire crepe, leaving just a small bit on the sides to allow for "squishing". (Technical term!)
Now sprinkle on the fish goodies! Try to spread them evenly over the entire area of mousse to keep things even while rolling. 

Time to roll! Take the edge closest to you and roll it like a sleeping bag. It's easiest once you're done rolling to leave the open edge on the bottom. This helps keep it from unrolling. 

Now cut the raw/uneven edges on either side of the log you made if you have them (I did!) and cut into even slices about an inch thick. Mine produced about 8 pieces when I cut them. Yours might be more or less depending how big your crepe was. 


There you have it! Depending on how hungry you are after having made these, decorate your plate before adding the sushi! I brought mine to our friend's house for a dinner so I didn't get to devour them right away! Definitely keep them refrigerated until ready to serve.

Psst!! Don't like chocolate? Make it vanilla! I'm going to try that next time. Color the batter green and really trick everyone!

Whitney


Monday, August 26, 2013

Simple Fondant Carnation Tutorial


Welcome to my very first tutorial!

I thought a carnation was a good start for the both of us. I still consider myself very new at cake decorating, especially when it comes to fondant/gumpaste flowers. These are easy to do and the more you mess them up, the more realistic they look.Win/win!

Deep breath....

Here are the supplies you will need for your carnation.


1. A cup of water
2. Small plastic cups for drying (or anything that the flower can be placed in to dry
3. and 4. Scalloped circle cutter, comes in a graduated set. Use the size you would like your flower to be. I used the green, it is a 2 inch circle resulting in a 3 inch flower
5. Small food-safe paint brush
6. Flower forming pad
7. Veiner tool (mine is part of Wilton's fondant tool set)
8. Fondant colored to your choice
9. Small fondant roller (you don't need the spacers if you don't want them!)

Why yes I know this looks strange...trust me, the awkward thing you're looking at goes away in a minute!

Start by rolling a golf ball sized piece of fondant (or gumpaste, or a combo. I prefer fondant) into a ball. Take one end and roll it so it comes to a cone/point shape. This is your "stem" and where the base of the flower starts. AKA -  the awkward nubby thing. It only needs to be an inch or so tall.

Now smoosh that ball so you have a flat bottom. Take your rolling pin and starting right next to the stem, start rolling and flattening the base on all sides until you have a thin circle the same thickness all around.

Center the cutter around the stem, scallop-side down, and press. Take away the excess fondant and cover it so it doesn't dry out. You will use it later for the next layers.


Put your scalloped pacifier (isn't that what it looks like?!) on the flower former. Using the thicker end of the veiner, start in the middle of one scallop and with fairly firm pressure, pull down and outward, thinning the fondant and ruffling it. Make sure you use the flat/wide part of the veiner and not the pointy end. That will rip the fondant to shreds, not thin it.

I started in the middle of each scallop and went side to side to keep the scalloped look there for the finished product. I also found the further towards the middle you start thinning (leave about a nickle sized in the middle untouched), the more the flower will ruffle and have lots of movement (always a good thing!) A little tearing at the thinnest part looks realistic and is very forgiving.

When you're done, flip it over and put it in a cup. Nubbin is hidden!

Roll out more fondant and cut out two more circles and thin each one to match the base. Brush a little water on the base to help the fondant stick and layer each on top of your original base. You can fluff the layers as desired to get a really full look. (As seen in first picture below).


 After you have your three base layers (first picture shown above) repeat the ruffle/thinning technique three more times. I know, you're sick of ruffling. Trust me, it's almost done and the result is very pretty!

Fold this ruffle in half, and then half again so you have a little triangle and four layers of petals.

Mentally split the base into thirds. Brush on a little bit of water and put the ruffle triangle onto the base, ruffles facing out, pointy end in the center. Repeat 2 more times.

The last picture shown looks a little...not finished! I have a trick for you so that you don't have that big gaping hole in the center.


Take the end of your paintbrush or a rolling stick and at each individual triangle, bury it under the second or third ruffle and gently push. This causes the inner layers to stand up and the gap is gone! There will be a small "hole" where you pushed, so be sure to fluff the petals around it to cover it up. You'll never see it!

Now that you're finished, you can put your new carnation in a schmancy little cup like mine, or use it to decorate a cake!


I'm kidding, I'm really using these on Goose's birthday cake this weekend. But aren't they cute in the cup? I mean, really.

Thanks for sticking aroundl! If you made some of your own, feel free to share! I'd love to see more carnations in cups. OK, and on cakes too!


Monday, July 1, 2013

Repeat Offenders

Hello again! Are you tired of the law enforcement related titles? Too bad!

I'm kidding, I'm kidding. Come back and read the rest :) 

What I'm not kidding about is the actual problem I'm having here recently with Sticky-Finger Sams. I had several repeat offenders last weekend. One was a close call with 200 wedding cupcakes, and the other was a gobbled up entry to my church's bake-off contest (thanks to McLovin's uncle. I'm not mad. I just figure, he was giving the other people a chance to win hehe). 

Did I mention besides my toddler and husband, we also have his 92 year old grandma living with us? We do. She's a doll, we just love her to pieces. What I didn't know was, she's the worst of the cleptos! I caught her trying to get into some of the cupcakes I made for my friend's wedding. She disguised it as "helping" us with the cupcake wrappers. 

Here she is, hard at work. Aren't they cute? Love my little helpers when they're behaving :)


Of course I paid her for her work in the form of an extra cupcake I had made. Then she waited until I was busy giving Goose her bath later that evening to really make her move. I heard some rustling around in the cupcake area and find the walker-wielding lady ambling towards the 200 decorated and boxed cupcakes, with a look in her eyes only to be described as gleaming.

Y'all, I almost died. I steered her away with a less popular form of dessert called a fig newton. McLovin and I decided to write "FOR WEDDING, DO NOT EAT" on all the boxes in hopes when she woke up the next morning she wouldn't think this was her breakfast. 

It worked! Here they are, untouched by toddlers or senior citizens, all ready for the wedding. This was my first-ever wedding order, and I'm pretty proud of them! I'm also proud of my family for not eating them all!


Thanks for stopping by, and happy National Sugar Cookie Day!

Whitney 
   

Thursday, June 20, 2013

Put your hands where I can see them!

Today I entered my second online cookie decorating contest (see the first here. I posed as whitney1170 back then). Do I expect to win? Nope. I just thought if I posted my stuff on other websites it would give me more exposure.

Has it worked?

Check back with me tomorrow :)

Before I could even get a few decent pictures of the cookies, I catch my toddler (I'll call her Goose. Or Ninja) carrying one around, waiting for the perfect time to bite into it. Then as my husband (the actual law enforcement officer in the family. Let's call him McLovin) is leaving for work, he's begging to take them as a "snack".

I know, people, they look delicious! It's hard enough to decorate them without chowing down on them myself. But could we practice a little self restraint here? I'm tryin to be all famous on the Internet, mmmkay?

This time I wanted to enter Lilaloa's monthly contest. She picks great themes every month and chooses the winner from a drawing, not from "who's the most talented of all time". I kinda like that.


What do you think? Would you try to steal them too?

Until next time, be kind to your fellow baker. No stealing!

Whitney 

P.s. next time you visit, I will hopefully have a brand spankin new logo and lots of customized stuff. Fancy, no?